
Showing posts with label 15mm Fantasy. Show all posts
Showing posts with label 15mm Fantasy. Show all posts
Friday, February 21, 2014
Splintered Light Adventurers I

Monday, February 17, 2014
Have battlefield, will travel
So there is a company out there that makes that makes terrain called "Battlefield in a Box". It is really nice looking stuff, but it is very expensive and not really what we would consider a "battlefield" here at TBT. So we decided to try making our own, a complete battlefield in a neat, easy to transport package.
Here is the box:
 Drawing inspiration from Tiny Solitary Soldiers, and War in a Box, we wanted something that was small, modular, and capable of a wide variety of sit-ups. The box above is 13" x 13" and about 3 inches tall. That is a 15mm mini from Khurasan in the picture for scale.

Inside we have a variety of hills made from cork board. The larger ones have a flat edge allowing them to be butted together to form a single large hill, or to be placed along the board edge as separate hills. Most of the smaller hills sit nicely atop the big ones to add additional relief when desired.
 In addition to the hills, we've got four 12 x 12 tiles that form our skirmish board. As you can see each tiles has a section of a stream on it, and they can be rotated to make different combinations.
 In addition the back of each tile is also finished, allowing us to flip the tiles to create a large variety of different playing surfaces. I've coated each tile in several layers of PVA glue to create a tough finish. We also have gotten some scrap fabric that goes in between the tiles when they are in the box.
 To finish off what is in the set at the moment, there is a small bag of shrubs and other vegetation. Hopefully this will make a nice board for small 15mm sci-fi and fantasy skirmishes, as well as our board for some 6mm MechaWar. Altogether this was about $35 USD, including the plastic box to carry everything in. So there it is, let us know what you think!

Here is the box:
Inside we have a variety of hills made from cork board. The larger ones have a flat edge allowing them to be butted together to form a single large hill, or to be placed along the board edge as separate hills. Most of the smaller hills sit nicely atop the big ones to add additional relief when desired.
Tuesday, February 11, 2014
From the murky depths emerges...
From the murky depths of my painting desk emerges ... band of Salamen!


 Well, er, at least part of a band!Here is the start of my 15mm Salamander men from Khurasan. These minis have a lot of character, and were really fun to paint. I've got another 9 almost done, so hopefully this weekend I will be ready to play a couple skirmish games. We tried Song of Blades and Heroes last time, I am not sure if we will stick with that or try something different. It is very much a push-your-luck mechanic, which my brother really liked. For these guys one thing I've thought about is that instead of giving them tail-slap or similar abilities, it might make a fun game where if they end their turn in water, you replace the model with a pair of counters/blips, one representing the actual model and the other a dummy. They would be revealed only when the model moves out of the water... has anyone tried this sort of mechanic before? It would give a very different feel to the way they play and the strategy could be totally different than a normal skirmish. I see these guys coming out of the water, sniping their opponents, and then slipping back under the water's murky surface.
Which brings me to another project that I've been working on that is almost done: another 2x2 skirmish board. This one will again be modular, but will represent a landscape with a river running through it. The linear water feature might make it challenging to guess where those salamanders are swimming!
 Here is the start, again they will be a type of cork tile glued to a 12x12 commercial vinyl tile. The commercial tiles are 1/8 of an inch thick and way more rigid than a normal tile. Armstrong is the brand I've been using, they are $0.60 each at the hardware store.
Which brings me to another project that I've been working on that is almost done: another 2x2 skirmish board. This one will again be modular, but will represent a landscape with a river running through it. The linear water feature might make it challenging to guess where those salamanders are swimming!
Thursday, December 19, 2013
15mm Caverns - Tutorial
A couple of folks have asked about how I made the modular caverns, so here is the process I used. First the materials:
Equipment:
12 inch metal ruler
A cheap paint brush
A permanent marker
A knife
A few containers for mixing glue and/or paint
A bottle of elmers glue
Two different tones of brown acrylic craft paint ($1.50 each)
One package of Dark Cork Tiles (12 inches by 12 inches) ($9.99 at Hobby Lobby)
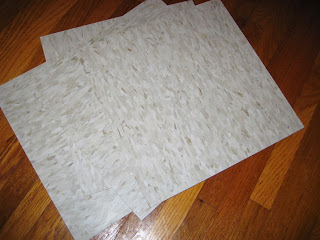
4x Armstrong's 1/8 inch thick commercial vinyl flooring tiles (12 inches by 12 inches) ($0.63 each Menards)
A pencil
A piece of graph paper.
Some ballast, sand, grit etc
These are the vinyl tiles:
Step 1. Design the tiles on graph paper. I was designing this for 15mm, so I decided to use a 1 inch grid. On each tile edge I nominated squares 3, 6&7, and 10 as potential passage ways, and each edge has an opening at at least two of these locations. This creates at least one open passage between adjacent tiles in any combination. The center passages were two space wide to make corridors for larger based figures.
The Master Plan:

The key to keeping it modular is to make sure that your transitions line up at the same point on the grid on all four sides.
Step 2. Once I had a plan, I used a ruler and marker to draw a grid onto the flooring tiles. I then painted the grid squares where the walls would be with a base coat of the darker paint. I over painted the edges generously so that when I glued the walls down, I wouldn't have to go back and try to get paint under the edge of all of those irregular shaped walls.
Here is one of the layouts, the X's are to remind me where the walls will be.

Here is the with where the walls go painted:
 Step 3 - Building the walls. Next I cut the walls out of the cork. I used a knife to keep the edges clean along the corners, so that when pressed against other tiles, they come together nicely. I also was careful to keep all of the openings and passage ways at least one complete grid square open so that you don't end up with passage that you can't fit a base through. Otherwise I wasn't to careful and mostly broke the cork with my hands. I would do one tile, then other three, before coming back to the first after the glue dried to make another layer. I ended up using three layers of cork for all the walls to make them a little taller then a 15mm human.
Here is the first layer of cork walls:

Step 4: After the walls were glued into place, I went and painted all the tiles. When the paint dried I used a 50/50 mix of elmers glue and water, brushed on all the passage ways, and sprinkled it with two different size and color ballast/sand. First the large diameter, then the smaller. After that dried I shook off the extra ballast, and dab with a 50/50 mix of glue and water again.
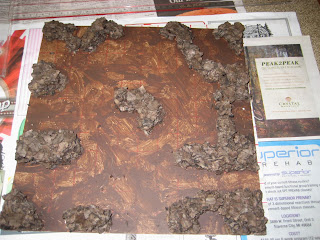

Step 5. Okay, that's just about it. I then painted the cork with the darker brown, and when it dried dry-brushed it with the lighter brown. Then I covered the whole thing in another layer of 50/50 glue water mix to seal it good.
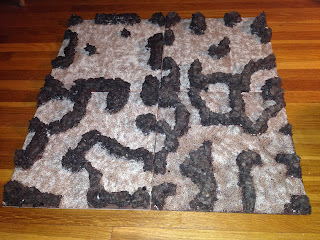
There it is! Hope it helps. It has a lot of narrow passages and choke points, so it should be interesting.
Equipment:
12 inch metal ruler
A cheap paint brush
A permanent marker
A knife
A few containers for mixing glue and/or paint
A bottle of elmers glue
Two different tones of brown acrylic craft paint ($1.50 each)
One package of Dark Cork Tiles (12 inches by 12 inches) ($9.99 at Hobby Lobby)
4x Armstrong's 1/8 inch thick commercial vinyl flooring tiles (12 inches by 12 inches) ($0.63 each Menards)
A pencil
A piece of graph paper.
Some ballast, sand, grit etc
These are the vinyl tiles:

Step 1. Design the tiles on graph paper. I was designing this for 15mm, so I decided to use a 1 inch grid. On each tile edge I nominated squares 3, 6&7, and 10 as potential passage ways, and each edge has an opening at at least two of these locations. This creates at least one open passage between adjacent tiles in any combination. The center passages were two space wide to make corridors for larger based figures.
The Master Plan:

The key to keeping it modular is to make sure that your transitions line up at the same point on the grid on all four sides.
Step 2. Once I had a plan, I used a ruler and marker to draw a grid onto the flooring tiles. I then painted the grid squares where the walls would be with a base coat of the darker paint. I over painted the edges generously so that when I glued the walls down, I wouldn't have to go back and try to get paint under the edge of all of those irregular shaped walls.
Here is one of the layouts, the X's are to remind me where the walls will be.

Here is the with where the walls go painted:

Here is the first layer of cork walls:

Step 4: After the walls were glued into place, I went and painted all the tiles. When the paint dried I used a 50/50 mix of elmers glue and water, brushed on all the passage ways, and sprinkled it with two different size and color ballast/sand. First the large diameter, then the smaller. After that dried I shook off the extra ballast, and dab with a 50/50 mix of glue and water again.


Step 5. Okay, that's just about it. I then painted the cork with the darker brown, and when it dried dry-brushed it with the lighter brown. Then I covered the whole thing in another layer of 50/50 glue water mix to seal it good.

There it is! Hope it helps. It has a lot of narrow passages and choke points, so it should be interesting.
Tuesday, December 17, 2013
15mm Caverns
Okay, so you can't afford a lot of nice resin terrain, have a limited space for storage and playing...what are you going to do to get those little men onto the playing field? Here is the first set of modular terrain I am making for gaming with my older brother this winter. It is a set of caverns that will serve double purpose for games of FUBAR and Songs of Blades and Heroes to start with. Here is the first tile:


Subscribe to:
Posts (Atom)