Sunday, December 29, 2013

AAR 15mm FUBAR Krystrial vs. New Israeli

We played our first couple games using the modular caverns over the holidays.  My brother used his GZG New Israeli's, while I fielded some of Micropanzer's Krystrial Empire.  We placed a damaged tracked drone in the middle of the caverns.  This automated robot had been sent by the Israeli's to covertly recon a subterranean installation.  After completing its survey it was discovered and damaged before it was able to complete its data transmission.  Before it could be destroyed it escaped into the tunnels.  The data received in the partial transmission was concerning enough that the Israeli's decided to send in a recovery team to download the drone's memory manually. The Krystrial Overlord also wanted to know exactly what the drone had discovered, and dispatched his men to recover it.

Scenario Objectives: The drone was set up in the middle of the table, at the beginning of each turn it moved 1d6 inches in a random direction.  If a model from either side was in contact, it no longer moved and once per turn the model could try to download the memory file on a 4+.  Then the model with the download had to move off the board through a passage on his side.

The New Israeli's had a two anti-grav drones and a three spider drones.  They also had two 6 man fire-teams with four riflemen, a LMG and a RPG in each team.  The drones proved to be very tough and very reliable. 


The Krystrial had four fire teams, each with four models. There were 12 Raivaui armed with laser weapons which made up up 3 of the teams, and 4 veteran Krystrial soldiers with shotguns.

We played the scenario a couple of times using different map configurations.  The tight narrow corridors make for some pretty close and deadly combat.  My Raivaui managed to reach the drone first in both games.  Once in contact, they quickly came under fire while trying to download the data and between suppression, bad rolls, and attempts to get the data would be pinned in the same spot for most of the game, while I maneuvered two teams up to support them, and kept the last to cover their path of retreat.

Eventually, the combined fire power of the three fire teams caused the New Israel's to fail a few activations, and the team with the data managed to withdraw behind a screen of other fire teams.  Both games were pretty close, with the Israeli's drones moving in quickly and making contact before their infantry teams could move into position to support them.  The Krystrial Empire took heavier causalities (about 50% each game) while the Israeli's lost a lot of drones.


I think if we had at least two more boards with less cover it would improve this kind of scenario. On a 2'x2' board with so much cover the benefits of the laser rifle over the assault rifle are minimized. In addition a 12" run gets you to and from the objective pretty rapidly, especially if the opposition force fails activations. We are using the fourth edition rules + generic sci-fi.

Thursday, December 19, 2013

15mm Caverns - Tutorial

A couple of folks have asked about how I made the modular caverns, so here is the process I used.  First the materials:

Equipment:
12 inch metal ruler
A cheap paint brush
A permanent marker
A knife
A few containers for mixing glue and/or paint

A bottle of elmers glue
Two different tones of brown acrylic craft paint ($1.50 each)
One package of Dark Cork Tiles (12 inches by 12 inches) ($9.99 at Hobby Lobby)
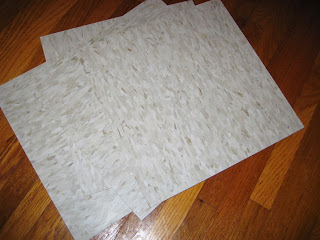
4x Armstrong's 1/8 inch thick commercial vinyl flooring tiles (12 inches by 12 inches) ($0.63 each Menards)
A pencil
A piece of graph paper.
Some ballast, sand, grit etc

These are the vinyl tiles:


Step 1.  Design the tiles on graph paper.  I was designing this for 15mm, so I decided to use a 1 inch grid.  On each tile edge I nominated squares 3, 6&7, and 10 as potential passage ways, and each edge has an opening at at least two of these locations.  This creates at least one open passage between adjacent tiles in any combination.  The center passages were two space wide to make corridors for larger based figures.

The Master Plan:

The key to keeping it modular is to make sure that your transitions line up at the same point on the grid on all four sides.

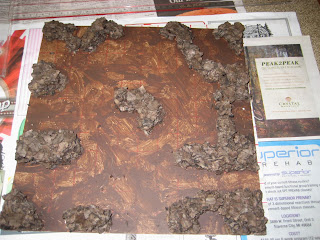
Step 2.  Once I had a plan, I used a ruler and marker to draw a grid onto the flooring tiles.  I then painted the grid squares where the walls would be with a base coat of the darker paint.  I over painted the edges generously so that when I glued the walls down, I wouldn't have to go back and try to get paint under the edge of all of those irregular shaped walls.

   Here is one of the layouts, the X's are to remind me where the walls will be.


Here is the with where the walls go painted:
  
 Step 3 - Building the walls.  Next I cut the walls out of the cork.  I used a knife to keep the edges clean along the corners, so that when pressed against other tiles, they come together nicely.  I also was careful to keep all of the openings and passage ways at least one complete grid square open so that you don't end up with passage that you can't fit a base through.  Otherwise I wasn't to careful and mostly broke the cork with my hands.  I would do one tile, then other three, before coming back to the first after the glue dried to make another layer.  I ended up using three layers of cork for all the walls to make them a little taller then a 15mm human.

Here is the first layer of cork walls:


Step 4: After the walls were glued into place, I went and painted all the tiles.    When the paint dried I used a 50/50 mix of elmers glue and water, brushed on all the passage ways, and sprinkled it with two different size and color ballast/sand.  First the large diameter, then the smaller. After that dried  I shook off the extra ballast, and dab with a 50/50 mix of glue and water again.

Step 5.  Okay, that's just about it.  I then painted the cork with the darker brown, and when it dried dry-brushed it with the lighter brown.   Then I covered the whole thing in another layer of 50/50 glue water mix to seal it good.

There it is!  Hope it helps.  It has a lot of narrow passages and choke points, so it should be interesting.

Tuesday, December 17, 2013

15mm Caverns


 Okay, so you can't afford a lot of nice resin terrain, have a limited space for storage and playing...what are you going to do to get those little men onto the playing field?  Here is the first set of modular terrain I am making for gaming with my older brother this winter.  It is a set of caverns that will serve double purpose for games of FUBAR and Songs of Blades and Heroes to start with.  Here is the first tile:

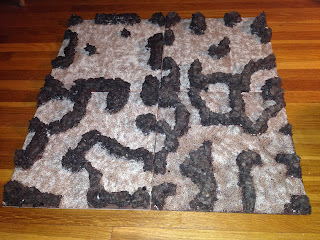
The tiles are 12 x 12 and are completely modular.  They can be rotated in any direction and moved around to create different lay-outs.  I started with four tiles, total cost per tile was about $3-4 US and took about an hour to make, not including waiting for things to dry.  I spent about four hours over the course of a weekend to get them to this point:

 I am working on some doors for Song, and probably some little holes for critters to crawl out of for FUBAR.  Here is a shot with a 15mm mini from Splintered Light for scale. Thanks for looking!